42 iic pin labels in arduino mega are
Arduino - OLED | Arduino Tutorial - Arduino Getting Started ALWAYS use the labels printed on the OLED module. Look closely! ... If you use other Arduino other than Uno, the pins are different. Refer below table for other Arduino. OLED Module Arduino Uno, Nano Arduino Mega; Vin: 5V: 5V : GND: GND: GND: SDA: A4: 20: SCL: A5: 21: How To Use OLED with Arduino Install SSD1306 OLED library. On Arduino IDE, Go ... Arduino Mega 2560 Layout, Specifications - Electronics Hub Apart from that, the layout of Arduino Mega is very much self-explanatory. I will discuss about the pins of Arduino Mega in the Arduino Mega Pinout Section. Technical Specifications of Arduino Mega. As Arduino Mega is based on ATmega2560 Microcontroller, the technical specifications of Arduino Mega are mostly related to the ATmega2560 MCU.
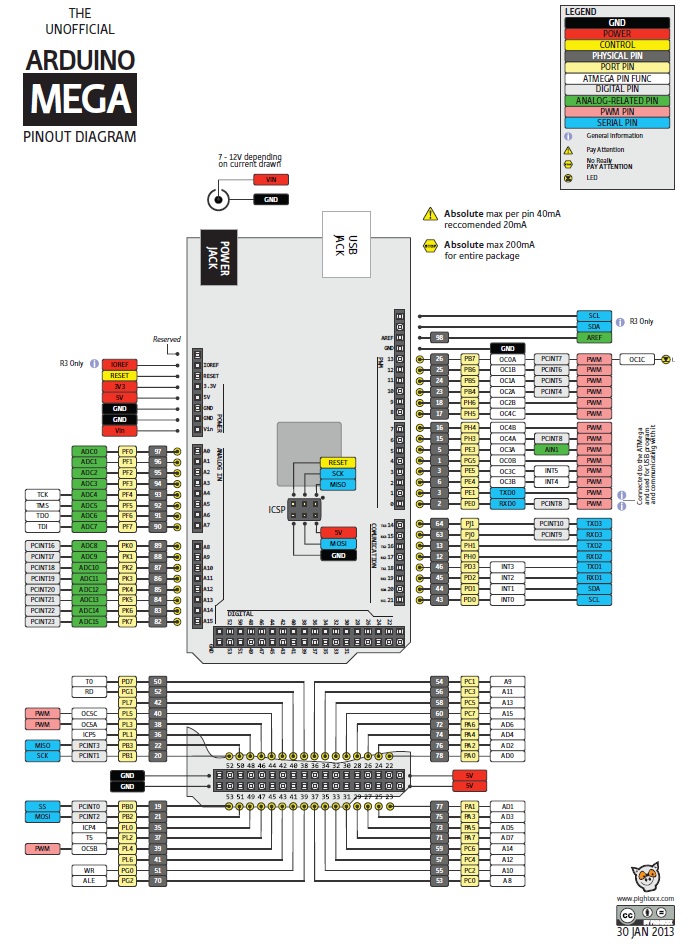
Ultimate Guide to Arduino Mega 2560 Pinout, Specs & Schematic Arduino Mega 2560 has 54 digital input/output pins, where 16 pins are analog inputs, 14 are PWM pins, and 6 are hardware serial ports (UARTs). It has a crystal oscillator-16 MHz, a power jack, an ICSP header, a USB-B port, and a RESET button. Arduino Mega Pinout. Voltage Regulator -The voltage regulator converts the input voltage to 5V.

Iic pin labels in arduino mega are
I2C Tutorial for Arduino, ESP8266 and ESP32 - DIYI0T Arduino Mega. SDA: PIN20 SCL: PIN21 (no label on the PCB front, only visible from the side) The two pins which you need for the I2C communication are the following: ... If you like to know how you can reduce the number of input pins for a keypad from 8 to only 2 I2C pins, with the help of the I2C multiplexer, then visit the keypad tutorial for ... Character I2C LCD with Arduino Tutorial (8 Examples) - Makerguides.com On the I2C module, you will find a potentiometer that you can turn with a small screwdriver. Plug in the USB connector of the Arduino to power the LCD. You should see the backlight light up. Now rotate the potentiometer until one (16×2 LCD) or 2 rows (20×4 LCD) of rectangles appear. I2C Communications Part 1 - Arduino to Arduino - DroneBot Workshop Use the two analog pins, A4 and A5, as shown in the table above. I2C Between 2 Arduino's. For our first experiment we will hoo two Arduinos together and exchange data between them. One Arduino will be the master, the other will be the slave. I'm using two Arduino Unos, but you can substitute other Arduino's if you don't have two Unos.
Iic pin labels in arduino mega are. Arduino Nano Pinout, Specifications, Features, Datasheet & Programming Arduino Mega is more powerful than an Arduino Nano in terms of speed and number of I/O pins. As you might guess, the size is also bigger than an Arduino UNO. Arduino Mega is normally used for projects which require a lot of I/O pins and different communication protocols. The technical difference between Nano and Mega is shown below. Interfacing Arduino with BMP280 pressure and temperature sensor Interfacing Arduino with BMP280 sensor circuit: Project circuit diagram is shown below. Note that the BMP280 module shown in the circuit diagram has a 3.3V regulator and level shifter. Generally, the BMP280 module has at least 4 pins because it can work in SPI mode or I2C mode. For the I2C mode we need 4 pins: VCC, GND, SDA and SCL where: Confused between SPI and I2C for SSD1306 OLED - Arduino Stack Exchange I recently got myself an SSD1306 OLED display: I haven't been able to successfully wire it to an Arduino (Mega 2560) however. I have been reading up on I2C and SPI and checked some libraries from Adafruit and U8G2. However, I'm confused, since most of the Internet is talking about a similar OLED display with GND - VDD - SCL - SDA labelled pins ... Ks0002 keyestudio Mega 2560 R3 Development Board Introduction. Keyestudio Mega 2560 R3 is a microcontroller board based on the ATMEGA2560-16AU, fully compatible with ARDUINO MEGA 2560 REV3. It has 54 digital input/output pins (of which 15 can be used as PWM outputs), 16 analog inputs, 4 UARTs (hardware serial ports), a 16 MHz crystal oscillator, a USB connection, a power jack, 2 ICSP headers, and a reset button.
Interface I2C 16x2 LCD with Arduino Uno (Just 4 wires) After soldering connect the I2C Module to Arduino Uno. Arduino Uno I2C module. Analog Pin 4 - SDA. Analog pin 5 - SCL. 5V - Vcc. GND - GND. Connect the Arduino to computer. Next open Serial monitor from the icon on top right corner of Arduino IDE. And set the baud rate as 9600. Please ensure the correct port. Using a 20x4 I2C Character LCD display with Arduino Uno - Electronics-Lab To make the connections, even more easier to follow, the pin connections of the components is described below. Arduino - LCD. GND - GND 5v - VCC A4 - SDA A5 - SCL. The DS3231 is connected in the same way; Arduino - DS3231. GND - GND 5v - VCC A4 - SDA A5 - SCL. With the connections all done, we can now proceed to write the code for the ... Arduino - LCD I2C | Arduino Tutorial - Arduino Getting Started Quick Steps. On Arduino IDE, Go to Tools Manage Libraries. Search "LiquidCrystal I2C", then find the LiquidCrystal_I2C library by Frank de Brabander. Click Install button to install LiquidCrystal_I2C library. Copy the above code and open with Arduino IDE. Click Upload button on Arduino IDE to upload code to Arduino. See the result on LCD. Arduino Mega Tutorial - Electronic Circuits and Diagrams-Electronic ... It is also compatible with the different type of boards like high-level signal (5V) or low-level signal (3.3V) with I/O ref pin. Brownout and watchdog help to make the system more reliable and robust. It supports ICSP as well as USB microcontroller programming with PC. The Arduino Mega 2560 is a replacement of the old Arduino Mega, and so in ...
Arduino Nano: Pinout, Wiring Diagram and Programming - Diystadium Pin Number/Name: Pin Category: Pin Description: Vin, 3.3V, 5V, GND Power: Vin: The input voltage to Arduino board when it is using an external power source 5V: This pin outputs a regulated 5V from the regulator on the board. 3.3V: Can be used to power other external components which use a 3.3V connection GND: Ground pins: any of which can be used to ground your circuit Two Arduino Mega 2560 I2C - Programming Questions - Arduino Forum Hallo, I'm a beginner at using Arduino. I have two Mega 2560 with each 14 SHT7 sensors. I want to Set one as Master and the other as Slave. Then the Master has to trigger the sampling of the sensors for both boards (trigger a function on the slave board). I thought of using the I2C connection with SDA and SCL. I already researched how to do the wiring including the 5V with the pull ups. Arduino Mega Mega2560 I2C on pins A4 and A5 for Arduino UNO shield ... The Arduino Mega 2560 has also interrupts at pin 2 and 3. The worst case is that you have to stick two wires from SDA and SCL (near AREF) to A4 and A5. If something does not work (for example in the library), then you can fallback to an Arduino Uno. arduino-info - LCD-Blue-I2C - UPM This unit connects with 4 wires including Vcc and Gnd. It is easiest with a 4-wire cable (supplied) that plugs into the Sensor Shield communications connector. On most Arduino boards, SDA (data line) is on analog input pin 4, and SCL (clock line) is on analog input pin 5. On the Arduino Mega, SDA is digital pin 20 and SCL is 21.
Now that the Arduino and pins are aligned you can solderpins at the corner (Arduino side and PCB ...
Wire - Arduino Reference As a reference the table below shows where TWI pins are located on various Arduino boards. As of Arduino 1.0, the library inherits from the Stream functions, making it consistent with other read/write libraries. Because of this, send () and receive () have been replaced with read () and write (). Recent versions of the Wire library can use ...

Pin on Arduino
wrong number of arguments error in example code · Issue #2 · cirthix ... Arduino: 1.8.8 (Mac OS X), Board: "Arduino/Genuino Mega or Mega 2560, ATmega2560 (Mega 2560)" SoftIIC_example_master:12:70: error: no matching function for call to 'SoftIIC::SoftIIC(const uint8_t&, const uint8_t&, bool, int, bool)' SoftIIC my_SoftIIC = SoftIIC(SCL_PIN, SDA_PIN, true, IIC_SPEED, true); ^ In file included from /var/folders/j4 ...

Interfacing the Arduino with Custom Circuits - Zippy Robotics, Inc
KS0498 Keyestudio MEGA 2560 R3 Development Board(Compatible Arduino) Keyestudio Mega 2560 R3 is a microcontroller board based on the ATMEGA2560-16AU , fully compatible with ARDUINO MEGA 2560 R3. It has 54 digital input/output pins (of which 15 can be used as PWM outputs), 16 analog inputs, 4 UARTs (hardware serial ports), a 16 MHz crystal oscillator, a USB connection, a power jack, 1 ICSP header, and a reset ...

Arduino Mega - Digital Pin Question | All About Circuits
Using I2C SSD1306 OLED Display With Arduino - Electronics-Lab An Arduino, (Arduino Mega in this tutorial) Power source, Powerbank, Battery, or USB cable. Wires. The Circuit. The circuit is very simple. First, connect the GND with Arduino GND, VCC with 3.3V or 5V on Arduino, SCL with SCL, and finally SDA with SDA pin. Upload the code and power on the Arduino.

Simple Labs' Quick Start Kit for Arduino: Simple Labs' Quick Start Kit for Arduino - 7-Segment ...
ER-TFTM070-6 EastRising display with RA8876 controller and FT5316 #406 The following code "capacitive_7in_panel" worked! (I did have to connect pin 7 from the shield to pin 2 on the Arduino Mega, because pin 7 is not usable as an interrupt.) Great news. Now we need to use this code to get a library for you to use with GUIslice.

Arduino Leonardo as a MAME interface
Hearty Label how to turn an excel spreadsheet into labels; hybe labels audition india; iic pin labels in arduino mega are; iron on woven name labels; is island records a major label; island record labels; island records uk record labels; italian wine labeling laws; italian wine labels explained; label ideas & co; label maker p touch instructions; labels 48 ...

Pin on Featured Products
Dished Label how to remove printed labels on clothing; iic pin labels in arduino mega are; independent record labels in america; iphone 7 fcc labels; iron on clothes labels next day delivery; iron on labels for clothes nz; jam jar label size; jam jar labels nz; keith and kristyn getty record labels; kids labels for school supplies; labels and other stories

Pin on Arduino projects
PCF8575 i2c 16 bit digital I/O expander - Renzo Mischianti Library to use i2c pcf8575 IC with arduino and esp8266. This IC can control (until 16) digital devices like button or led with 2 only pins. Can read and write digital value with only 2 wire (perfect for ESP-01). I try to simplify the use of this IC, with a minimal set of operation. ... Here the pins label.
Arduino pinout - Микроконтроллеры - Инструкции - Каталог статей - RC - Мастерская
Arduino Mega Pinout Diagram - Use Arduino for Projects The Arduino Mega is a microcontroller board based on the ATmega1280 (datasheet). It has 54 digital input/output pins (of which 14 can be used as PWM outputs), 16 analog inputs, 4 UARTs (hardware serial ports), a 16 MHz crystal oscillator, a USB connection, a power jack, an ICSP header, and a reset button.
Post a Comment for "42 iic pin labels in arduino mega are"